| The Kentucky Bluebird Box |
|---|
 |
Directions
tools and materials:
From the 1x6, cut 3 8-inch pieces for sides and roof. From the 1x4, cut 2 7-inch pieces for the front and back, and 1 4-inch piece for the floor.
assembly:
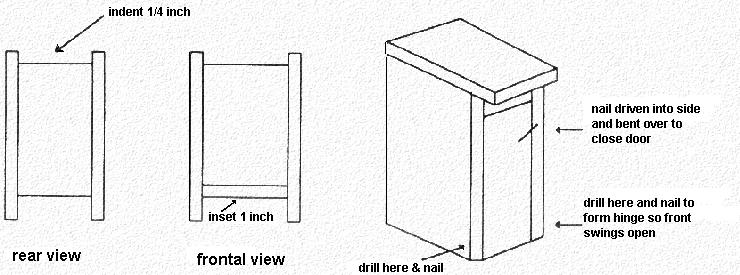
- Drill through side into the edge of the back and nail. Repeat the other side.
- Put the floor in place against the back and inset one inch from the bottom. Drill and nail into place.
- Drill the roof and nail into place, or fasten with drywall screws.
- Put the front into place so that its top edge is within 28-30mm (1 1/8) inch of the roof. Drill through the side (1/2 inch above its lower edge) into the edge of the front and nail. Repeat other side.
- Drive a finishing nail half way into the edge of a side and bend it over to hold the front in place. It can be pushed aside to open the box.
- Check your entrance measurements. It must be at least 28mm at some point and no more than 30mm at any point. Slight errors can be corrected by tapping with a hammer.
- Drill holes in the sides or back, or both for wiring your box to a fence or post or bolting it to a pipe.
Note: Bluebirds prefer a deeper (4 to 5-inch) box. If sparrows are a problem, put in a piece of 2x4 to make box more shallow. Keep boxes low (4 to 5-feet), because sparrows prefer higher boxes. Always have at least two boxes up; sparrows take the empty box, rather than evict the bluebirds.
Dr. Wayne H. Davis, Retired School of Biological Sciences, University of Kentucky
HOME ADDRESS:
130 Jesslin Dr., Lexington, KY 40503
(859)277-4330
Feel free to contact for questions and comments.